Auth API
Physical authenticity validation
The VivoKey Authenticity API enables applications and services to check the authenticity of components and products containing VivoKey technology using strong standards based cryptographic proofs over NFC (contactless near field communication).
Cryptographic authenticity flow
The exact steps taken depend on the type of VivoKey NFC chip being scanned, but the basic flow is the same for all product types. Once the NFC chip is scanned, a cryptographic challenge is obtained from VivoKey servers. That challenge is passed to the VivoKey NFC chip and a response is generated. The response is sent back to VivoKey for validation.

VivoKey authenticity token
Once a successful cryptographic verification of VivoKey chip authenticity is completed using the API, a signed VivoKey authenticity token is issued in JWT format. The typical format of a JWT is three Base64-URL strings separated by dots that can be easily passed in HTML and HTTP environments, while being more compact when compared to XML-based standards such as SAML.
Example Json Web Token (JWT)

Various aspects of the authenticity token will be referenced in the API documentation below, so you might want to gain a cursory understanding of its structure and purpose before proceeding with the API documentation.
Working with the API
The VivoKey Authenticity API is designed to be open and extremely easy to use. You will need an API key to talk to the Authenticity API, but the only requirement to get one is to submit your email address. An API key will be automatically generated and emailed to you instantly. The API key must be included in the HTTP header X-API-VIVOKEY for every call to an API endpoint. The Content-Type must be application/json and the JSON object data must be posted as raw data, not form encoded data, or your posted data will not be processed.
Base URL: https://auth.vivokey.com
Content-Type: application/json
X header: X-API-VIVOKEY
API key: Get one here!
For example, when using CURL to interact with the API, you would prepare your parameters like so;
curl -H "Content-Type: application/json" -H "X-API-VIVOKEY: d28a293f-44ec-4f2a-bf56-6bd546f47e1f" -X POST https://auth.vivokey.com/challenge -d '{"scheme": 1}'
Error or failure modes are rather simple;
- HTTP error code 400 (Bad Request) will be returned if there are syntactical problems with the data submitted.
- HTTP error code 401 (Unauthorized) will be returned if you forget to include the X-API-VIVOKEY header or provide an invalid API key.
- HTTP error code 406 (Not acceptable) will be returned from /session if there is a problem verifying authenticity of the chip
- HTTP error code 418 (I'm a teapot) will be returned if requests to /session use expired tokens.
API endpoints
The base URL for the authenticity API is https://auth.vivokey.com and there are only three relevant endpoints; challenge, session, and validate. These endpoints consume and return JSON objects. Remember to ensure your posts have the HTTP header Content-Type set to application/json or your post data will not be processed.
/challenge
This endpoint consumes a JSON object that contains one or more key-value pairs (KVP), depending on which chip type is being challenged. The endpoint will return a JSON object that contains a payload and token KVP. Challenges expire after 30 seconds.
KVPs sent to /challenge
| Key | Description |
|---|---|
|
scheme |
The scheme value can be 1 or 2. The scheme informs the challenge generator which type of VivoKey chip is being challenged. Scheme 1 requires no other KVPs, and generates a basic challenge for Spark 1 chips. Scheme 2 requires both uid and message KVPs, and generates a challenge for Spark 2 chips as well as Apex chips running the Spark app. |
|
uid |
[conditional] The UID is the unique identifier or serial number of the chip being challenged. Certain VivoKey chips have a 7 byte UID while others have an 8 byte UID. Value is represented in hexadecimal notation. The uid KVP is not required for scheme 1 challenges. |
|
message |
[conditional] For Spark 2 and Apex chips running the Spark app, the chip will generate a PCD challenge as part of the mutual authentication scheme used by the chip. This message is passed to the /challenge endpoint and an appropriate chip challenge is generated. Value is represented in hexadecimal notation. The message KVP is not required for scheme 1 challenges. |
KVPs received back from /challenge
| Key | Description |
|---|---|
|
payload |
The payload value is the VivoKey authenticity challenge which must be passed to the chip for processing. |
|
token |
The token value is an encrypted JWT called a challenge token. The challenge token must be passed to /session along with the chip response for the associated payload to /session. Challenge tokens expire after 30 seconds. |
/session
This endpoint consumes a JSON object that contains three KPVs. The endpoint will return a JSON object that contains a token KVP, the value of which is an authenticity JWT. The purpose of a signed token is to carry all of the valuable validated authenticity information inside itself, ensuring you can verify that a specific VivoKey chip scan was validated as authentic at a specific time, and has not been altered by any 3rd parties in transit. Authenticity tokens expire after 30 seconds and should not be used after it has expired (after exp). The endpoint is called session because the authenticity token is meant to be used to establish and maintain an authenticated session for VivoKey services, but you can also use it within your own services and applications.
KVPs sent to /session
| Key | Description |
|---|---|
|
uid |
The UID is the unique identifier or serial number of the chip being challenged. Certain VivoKey chips have a 7 byte UID while others have an 8 byte UID. Value is represented in hexadecimal notation. |
|
response |
For Spark 1, the response is a basic challenge response. For Spark 2 and Apex chips running the Spark app, the chip will generate a mutually authenticated response. The value is represented in hexadecimal notation. |
|
token |
The challenge token obtained from /challenge is sent back to /session. |
|
cld |
You have the option of passing any properly json encoded arbitrary data along with the chip response to /session (up to 1024 bytes). This data will be encoded into the authenticity token as a JWT claim called cld (client data). This allows you to embed application and user / client session relevant data to the chip scan event, making it part of the authenticity token. Passing the authenticity token to your backend or other services offers the same verifiable integrity protection to this data, meaning you can simply pass the token around your various external and internal endpoints with your application data rather than along side it. |
KVPs received back from /session
| Key | Description |
|---|---|
|
token |
The token value contains a signed JWT called an authenticity token. The token payload contains important verified data which can be used by your application or service, as well as passed between services as necessary. Each service or application which receives the authenticity token can validate its signature to verify authenticity of the token and its contents without ever having to call an API. |
/validate
This endpoint is used to validate counter based CMAC signatures. These are specific cryptograms certain VivoKey products can generate internally and insert into a standard NDEF data container at a specific offset. This makes reading the CMAC possible by just scanning the chip or product with any NFC enabled smartphone. No special app is needed. For example, a URL containing the CMAC signature can be read from the chip which will launch a web browser on the phone. The CMAC is received by the web server, which can be sent to the /validate endpoint to check for uniqueness and authenticity. The endpoint consumes the signature value and returns a JSON object containing a result value and, if the signature is valid and not expired (already used), then a token value is returned containing a signed authenticity JWT. The atp value within the token will be cmac.
Counter based CMAC authenticity checks are not as secure as other forms of direct authentication like tam and mau, so they should only be used for low risk purposes. In certain scenarios, it's preferable to not require a special application on the phone just to perform a basic authenticity check.
KVPs sent to /validate
| Key | Description |
|---|---|
|
signature |
The signature data specific to the VivoKey product that produced it. Spark 2 chips require the entire URL path following the vivokey.co/ domain and TLD be submitted with CMAC data included, while Apex based signatures require only the CMAC data itself. |
KVPs received back from /validate
| Key | Description |
|---|---|
|
result |
The result of the signature check. Possible values are success, expired, and invalid. The response value success means that the signature is valid and current, as in this signature is the most recent CMAC or highest counter value the server has validated from this product to date. A result of expired means that the signature contains a counter value that is not as recent as what has already been validated by the server. A result of invalid means there is a problem with the signature. |
|
token |
[conditional] The token value contains a signed JWT called an authenticity token. The token payload contains important verified data which can be used by your application or service, as well as passed between services as necessary. Each service or application which receives the authenticity token can validate its signature to verify authenticity of the token and its contents without ever having to call an API. The token KVP will only be supplied if the result key value is success. |
Using NFC to communicate
Sending data to a passive RFID transponder (all NFC transponders are RFID transponders, but not all RFID transponders comply with NFC standards) is done using commands over a particular "air interface" for the product in question. VivoKey products communicate using 13.56MHz RFID standards ISO14443A and ISO15693, and comply with NFC standards for Type 4 and Type 5.
Exactly how you send commands to VivoKey products over NFC depends entirely on the operating environment. For example, using Swift for iOS to submit a TAM1 challenge to a Spark 1 means you would use the authenticate command. On Android you would use NfcV and transcieve. If you are using PC/SC to communicate, Spark 2 speaks APDUs natively while the spark 1 may need commands sent over PC/SC as the payload of a standard APDU. Response data would also be suffixed with standard APDU status words (SW1, SW2) with values of 90 00 which means "command successfully executed".
Spark 1
The Spark 1 is an ISO15693 RFID transponder which complies with NFC Type 5 (NfcV for Android, NFCTagTypeISO15693 for iOS). If you are communicating with the Spark 1 over PC/SC using a CCID compliant reader, you may need to send ISO15693 commands using an APDU compliant command format or command wrapper. Check your reader's documentation.
Spark 1 authentication using TAM1 challenge response (tam)
For this example we will use a Spark 1 with an 8 byte UID of e0 04 01 18 00 9c 5d 52 (in MSB byte order). While not important for our API, it's useful to know the UID format of ISO15693 transponders is broken down into the following structure;
Byte 1: This is the Manufacturer code. It is assigned by the NFC Forum to each manufacturer. For example, Texas Instruments has the manufacturer code 0x01, NXP Semiconductors has 0x04, and so on.
Byte 2-3: These bytes represent the chip type. This is a unique code assigned by the manufacturer to each type of chip they produce.
Byte 4-8: These bytes represent the chip serial number. This is a unique number assigned by the manufacturer to each chip. It ensures that each chip produced by the manufacturer has a unique identifier.

STEP 1. Obtain a challenge from the /challenge endpoint
For Spark 1, send scheme value 1 to the API endpoint and receive a challenge payload and challenge token back.
{"scheme": 1}
{"payload":"3bc96bc85fa3405fe416","token":"eyJhbGciOiJkaXIiLCJlbmMiOiJBMjU2R0NNIn0..MhqTUKrdDjZSHSq9.EFn2Utl-hR1dTIwX_l9EREO4UPI6U2R1VtiFMcJfZUeSDiWBQCBan887f2cDKG0PRZWCwAL6gZim4dv02ruIyQZk3_OuMrMsmElEeDxkEzrOVOloLpiFL2wjug06fKcWXbhh5flImmRyuH5bbB_k8qWjD6HfDPiz8R0wFJ3gArx6-8sPbfLBF2UqIBIGBISMqerfz4nzsJY.f0f2S0RA5wGVUGfE2my8bg"}
STEP 2. Send authenticate command to Spark 1
The ISO15693 command represented in hexadecimal format below must be sent to the Spark 1 as an "addressed command", meaning you must include the UID of the transponder the command is intended for within the command structure itself, and the UID must be sent in LSB order. The challenge obtained from the server is appended to the end.
Command Code: 20 (authenticate)
Request Flag: 35
UID: 52 5d 9c 00 18 01 04 e0 (8 bytes of UID in LSB order)
CSI: 00 (AES)
RFU: 00
Key: 02
Challenge: 3b c9 6b c8 5f a3 40 5f e4 16
Complete command: 20 35 52 5d 9c 00 18 01 04 e0 00 00 02 3b c9 6b c8 5f a3 40 5f e4 16
How you send this command depends entirely on the operating environment. For example, using Swift for iOS means you use the authenticate command, which handles the command 20 and UID details for you. On Android you would use NfcV and transcieve. You should receive 12 bytes of data back which is the encrypted response data for the challenge you sent to the chip. If you are using PC/SC to communicate with the Spark 1, this data may be suffixed with APDU status words (SW1, SW2) with a success value of 90 00.
STEP 3. Submit the TAM1 response to the /session endpoint
{"uid":"e0040118009c5d52","response":"8d77260aea0fb3a68dc158aabbecb7a3","token":"eyJhbGciOiJkaXIiLCJlbmMiOiJBMjU2R0NNIn0..MhqTUKrdDjZSHSq9.EFn2Utl-hR1dTIwX_l9EREO4UPI6U2R1VtiFMcJfZUeSDiWBQCBan887f2cDKG0PRZWCwAL6gZim4dv02ruIyQZk3_OuMrMsmElEeDxkEzrOVOloLpiFL2wjug06fKcWXbhh5flImmRyuH5bbB_k8qWjD6HfDPiz8R0wFJ3gArx6-8sPbfLBF2UqIBIGBISMqerfz4nzsJY.f0f2S0RA5wGVUGfE2my8bg"}
{"token":"eyJ0eXAiOiJKV1QiLCJhbGciOiJFUzI1NiIsImtpZCI6ImprM3JXNEhBVm9HSzl6QVhsdnVzdnMxdTFLeVlMRUxYRG10OXlTOXViYUkifQ.eyJ0eXBlIjoxLCJwcm9kdWN0IjozLCJhdHAiOiJ0YW0iLCJzdWIiOiJlOGU5OGQ0MTVmM2I5NzI2MTE1ZjRiYjQ1NTNkZThmYTgxZTM3MjY5ZDUxMDkxNDgzMzUxMDYyMTMwOGFjN2IwIiwiaWF0IjoxNjg4NTgyNjkxLCJleHAiOjE2ODg1ODI3MjEsImlzcyI6Imh0dHBzOi8vYXV0aC52aXZva2V5LmNvbSIsImp0aSI6ImIzMTM5NmRmYzA0MGJjZmRmOTI4MGYwY2JlZDVjMWE2Zjk2NDUzZmZlM2VlMDljNWU0NTNmM2JkODIwMjM0ZjkifQ.Ep6PL6ySPagUHVeq-DSmASmui2VwJhaBk9ifSpIqTMQ_mlGrrAVxnCApjSC9jqQV2h5YGCISNpQN8ELWh0-YtQ"}
• Inspect authenticity JWT with jwt.io (includes public key to validate signature)
Spark 2
The Spark 2 is an ISO14443A RFID transponder which complies with NFC Type 4 (NfcA for Android, NFCTagTypeISO7816Compatible for iOS). The Spark 2 uses a traditional APDU compliant command format so communicating with a CCID reader over PS/SC should be straightforward.
Spark 2 authentication using mutual authentication (mau)
For this example, we will use a Spark 2 chip with a 7 byte UID of 04 29 38 22 2f 5c 80. The Spark 2 mutual authentication functions are tied to the standard NFC NDEF application ID (AID) for NFC Forum Type 4 transponders (D2 76 00 00 85 01 01 00), so we must start by selecting this AID using the standard select APDU command.
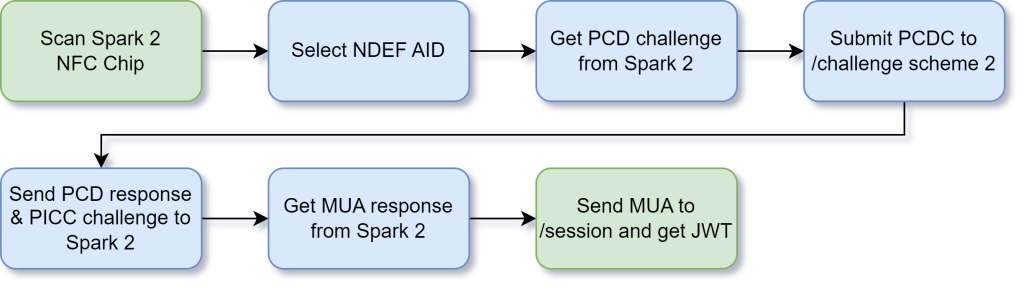
STEP 1. Select the NDEF AID
CLA: 00
INS: A4
P1: 04
P2: 0C
Lc: 07
Data: D2 76 00 00 85 01 01 00
Complete command: 00 A4 04 0C 07 D2 76 00 00 85 01 01 00
Receive: 90 00
You should receive no payload response, only status words SW1, SW1 with values of 90 00 which means "success".
STEP 2. Request PCD challenge
The Spark 2 begins mutual authentication by issuing a PCD challenge - a challenge to the API to prove we know the same key it does. This must be sent to the /challenge endpoint to obtain a PICC challenge - a challenge to the Spark 2 to prove it knows the same key we do.
CLA: 90
INS: 71
P1: 00
P2: 00
Lc: 02
Key: 02
Data: 00 00
Complete APDU: 90 71 00 00 02 02 00 00
Receive: 87 86 b1 2d 5e e7 14 de 5a 97 c5 c0 98 00 b6 68 91 af
The data received back should contain a 16 byte PCD challenge followed by two status words (SW1, SW2) with the values 91 AF which means "additional frame" expected. The Spark 2 is now expecting the next thing sent to it be a response to the PCD challenge along with a PICC challenge from the API.
STEP 3. Obtain a challenge from /challenge endpoint
For Spark 2, send scheme value 2 along with the PCD challenge and UID of the Spark 2. You will receive a payload that contains the PCD response and PICC challenge and a challenge token.
{"scheme": 2, "message":"8786b12d5ee714de5a97c5c09800b668", "uid":"042938222f5c80"}
{"payload":"cebee779170430704d6f9b28e5a2cad5eff20ce410233b19e4a9ae64e030c10f","token":"eyJhbGciOiJkaXIiLCJlbmMiOiJBMjU2R0NNIn0..7E30dAWbIIDnmTAK.N6EIEvT2VshQZd30z7S1IjKavR5IvHHOVxnrYDaEnMxX1rhghXHcxbdjnHIr2sTaAaGJfq5s_6gosLnbrAMJmmZloBAcsPuuUztp6sket9s8ZijXy7npChU9XrlTW-0RMGNx2l5X8BMVL4yAP5varLD7lMMnFPHqrJ6XvNx4N0ehW4pTRg_VqpJ08HeTbgR42zjFV8V_yIUQP28Ia7SCDmIn6ot-5Rl0.mmnJMa-1iv37SHXI_sOtEw"}
STEP 4. Send PCD response and PICC challenge
The Spark 2 now wants a 16 byte response along with a 16 byte PICC challenge it will respond to.
CLA: 90
INS: AF
P1: 00
P2: 00
Lc: 20
Data: ce be e7 79 17 04 30 70 4d 6f 9b 28 e5 a2 ca d5 ef f2 0c e4 10 23 3b 19 e4 a9 ae 64 e0 30 c1 0f
Complete APDU: 90 AF 00 00 20 ce be e7 79 17 04 30 70 4d 6f 9b 28 e5 a2 ca d5 ef f2 0c e4 10 23 3b 19 e4 a9 ae 64 e0 30 c1 0f
Receive: b6 0b 6b 38 ad 5c 8e d6 f0 b4 27 85 90 ce 9f 63 85 62 92 47 05 c7 c6 3f 89 d5 3d 67 4c 99 04 19 91 00
The data received should contain a 32 byte response followed by two status words (SW1, SW2) with the values 91 00 which means "ok".
STEP 5. Submit the mutual auth response to the /session endpoint
{"uid":"042938222f5c80","response":"b60b6b38ad5c8ed6f0b4278590ce9f638562924705c7c63f89d53d674c990419","cld":"{\u0022data\u0022:\u0022testing\u0022}","token":"eyJhbGciOiJkaXIiLCJlbmMiOiJBMjU2R0NNIn0..7E30dAWbIIDnmTAK.N6EIEvT2VshQZd30z7S1IjKavR5IvHHOVxnrYDaEnMxX1rhghXHcxbdjnHIr2sTaAaGJfq5s_6gosLnbrAMJmmZloBAcsPuuUztp6sket9s8ZijXy7npChU9XrlTW-0RMGNx2l5X8BMVL4yAP5varLD7lMMnFPHqrJ6XvNx4N0ehW4pTRg_VqpJ08HeTbgR42zjFV8V_yIUQP28Ia7SCDmIn6ot-5Rl0.mmnJMa-1iv37SHXI_sOtEw"}
{"token":"eyJ0eXAiOiJKV1QiLCJhbGciOiJFUzI1NiIsImtpZCI6ImprM3JXNEhBVm9HSzl6QVhsdnVzdnMxdTFLeVlMRUxYRG10OXlTOXViYUkifQ.eyJ0eXBlIjoyLCJwcm9kdWN0IjoyLCJhdHAiOiJtYXUiLCJjbGQiOiJ7XCJkYXRhXCI6XCJ0ZXN0aW5nXCJ9Iiwic3ViIjoiNjQ4ZmU2NThkYTdjNDg3NzkxZTg4ODc3NTE1M2Q3NjRmZWNlMzJmYjNkMTg5NWU1N2YxZDNjMzY5ZGFkYTk1MyIsImlhdCI6MTY4ODU4MzM4NSwiZXhwIjoxNjg4NTgzNDE1LCJpc3MiOiJodHRwczovL2F1dGgudml2b2tleS5jb20iLCJqdGkiOiIwZTgyYzFlZTllN2I4M2Q0Mzg1NWU2YjM4OGYxZmZiODI3OTE2MzQxNWJiNWU2NTMzODU4MDc4ZGY5YjM4ZTVhIn0.7xNJ6fSjf_CuawElJMZvnwvDF5VwBr6j4Wac2r2F7R0BoNydCXeQ72MUteZdwHDE6Z5_roh1sBrY-zs9pmQ-UA"}
• Inspect authenticity JWT with jwt.io (includes public key to validate signature)
Spark application for Apex
The Spark applet for Apex enables Auth API mutual authentication to the Apex chip platform. The Spark applet uses traditional APDU compliant command format so communicating with a CCID reader over PS/SC should be straightforward.
Mutual authentication using Spark applet on Apex
For this example, we will use an Apex chip with Spark application loaded. For the Spark applet on Apex, we do not use the chip UID. Instead, the Spark is programmed with an 8 byte UID that is returned as a result of selecting the Spark application. For this example, we will use of ff 00 01 8d 2c 10 16 79. We start by selecting the Spark AID A000000846737061726B3201 using the standard select APDU command.
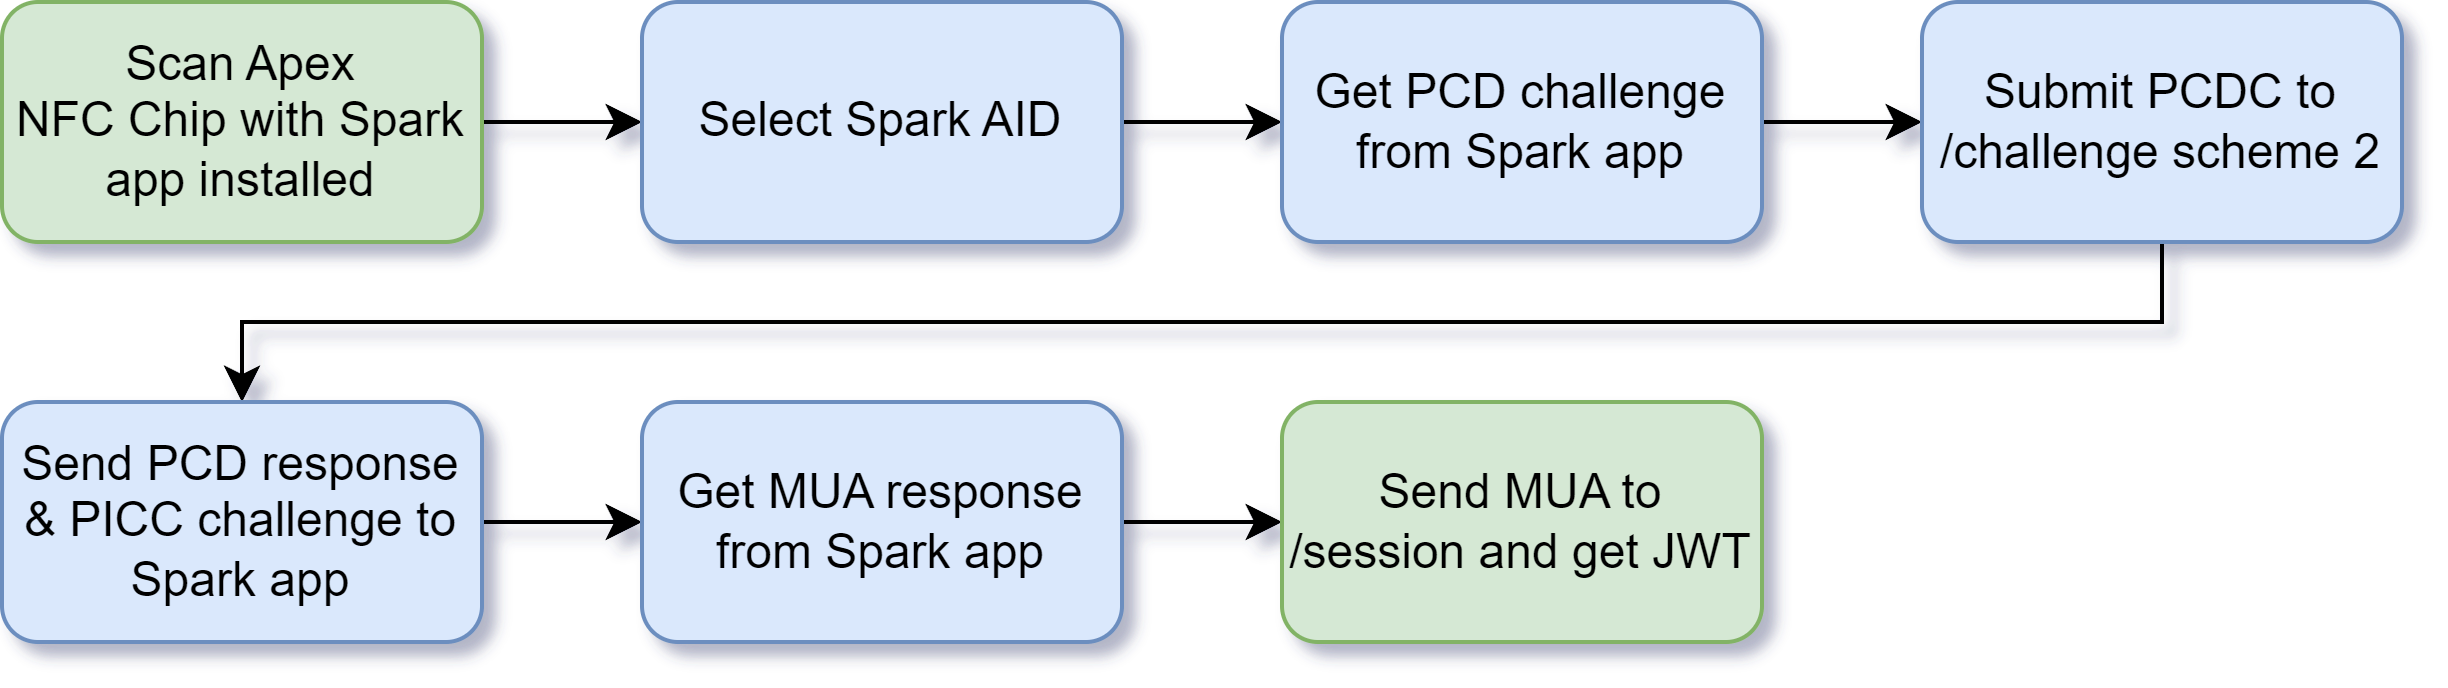
STEP 1. Select the Spark AID
CLA: 00
INS: A4
P1: 04
P2: 00
Lc: 0C
Data: A0 00 00 08 46 73 70 61 72 6B 32 01
Le: 00
Complete APDU: 00 A4 04 00 0C A0 00 00 08 46 73 70 61 72 6B 32 01 00
Receive: ff 0a 01 8d 2c 10 16 79 90 00
You will receive a payload response containing the 8 byte Spark ID (ff0a018d2c101679) followed by status words SW1, SW1 with values of 90 00 which means "success". You will need to use this Spark ID instead of the Apex chip UID when interacting with the Auth API.
STEP 2. Request PCD challenge
The Spark applet begins mutual authentication by issuing a PCD challenge - a challenge to the API to prove we know the same key it does. This must be sent to the /challenge endpoint to obtain a PICC challenge - a challenge to the Spark applet to prove it knows the same key we do.
CLA: 90
INS: 71
P1: 00
P2: 00
Lc: 02
Key: 02
Data: 00 00
Complete APDU: 90 71 00 00 02 02 00 00
Receive: 87 86 b1 2d 5e e7 14 de 5a 97 c5 c0 98 00 b6 68 91 af
The data received back should contain a 16 byte PCD challenge followed by two status words (SW1, SW2) with the values 91 AF which means "additional frame" expected. This PCD challenge is what we will send to the /challenge endpoint to obtain a PICC challenge along with a PCD response. The Spark applet is now expecting the next thing we send to be a response to the PCD challenge along with a PICC challenge from the API.
STEP 3. Obtain a challenge from /challenge endpoint
Send scheme value 2 along with the PCD challenge and Spark ID (not the UID of the Apex) to the /challenge endpoint. You will receive a payload that contains the PCD response, a PICC challenge, and a challenge token.
{"scheme": 2, "message":"8786b12d5ee714de5a97c5c09800b668", "uid":"ff0a018d2c101679"}
{"payload":"cebee779170430704d6f9b28e5a2cad5eff20ce410233b19e4a9ae64e030c10f","token":"eyJhbGciOiJkaXIiLCJlbmMiOiJBMjU2R0NNIn0..7E30dAWbIIDnmTAK.N6EIEvT2VshQZd30z7S1IjKavR5IvHHOVxnrYDaEnMxX1rhghXHcxbdjnHIr2sTaAaGJfq5s_6gosLnbrAMJmmZloBAcsPuuUztp6sket9s8ZijXy7npChU9XrlTW-0RMGNx2l5X8BMVL4yAP5varLD7lMMnFPHqrJ6XvNx4N0ehW4pTRg_VqpJ08HeTbgR42zjFV8V_yIUQP28Ia7SCDmIn6ot-5Rl0.mmnJMa-1iv37SHXI_sOtEw"}
STEP 4. Send PCD response and PICC challenge
The Spark applet is waiting for a 16 byte PCD response along with a 16 byte PICC challenge it will respond to.
CLA: 90
INS: AF
P1: 00
P2: 00
Lc: 20
Data: ce be e7 79 17 04 30 70 4d 6f 9b 28 e5 a2 ca d5 ef f2 0c e4 10 23 3b 19 e4 a9 ae 64 e0 30 c1 0f
Complete APDU: 90 AF 00 00 20 ce be e7 79 17 04 30 70 4d 6f 9b 28 e5 a2 ca d5 ef f2 0c e4 10 23 3b 19 e4 a9 ae 64 e0 30 c1 0f
Receive: b6 0b 6b 38 ad 5c 8e d6 f0 b4 27 85 90 ce 9f 63 85 62 92 47 05 c7 c6 3f 89 d5 3d 67 4c 99 04 19 91 00
The data received back should contain a 32 byte response followed by two status words (SW1, SW2) with the values 91 00 which means "ok". The 32 bytes of data is what we send to the /session endpoint for final validation.
STEP 5. Submit the mutual auth response to the /session endpoint
{"uid":"ff0a018d2c101679","response":"b60b6b38ad5c8ed6f0b4278590ce9f638562924705c7c63f89d53d674c990419","cld":"{\u0022data\u0022:\u0022testing\u0022}","token":"eyJhbGciOiJkaXIiLCJlbmMiOiJBMjU2R0NNIn0..7E30dAWbIIDnmTAK.N6EIEvT2VshQZd30z7S1IjKavR5IvHHOVxnrYDaEnMxX1rhghXHcxbdjnHIr2sTaAaGJfq5s_6gosLnbrAMJmmZloBAcsPuuUztp6sket9s8ZijXy7npChU9XrlTW-0RMGNx2l5X8BMVL4yAP5varLD7lMMnFPHqrJ6XvNx4N0ehW4pTRg_VqpJ08HeTbgR42zjFV8V_yIUQP28Ia7SCDmIn6ot-5Rl0.mmnJMa-1iv37SHXI_sOtEw"}
{"token":"eyJ0eXAiOiJKV1QiLCJhbGciOiJFUzI1NiIsImtpZCI6ImprM3JXNEhBVm9HSzl6QVhsdnVzdnMxdTFLeVlMRUxYRG10OXlTOXViYUkifQ.eyJ0eXBlIjoyLCJwcm9kdWN0IjoyLCJhdHAiOiJtYXUiLCJjbGQiOiJ7XCJkYXRhXCI6XCJ0ZXN0aW5nXCJ9Iiwic3ViIjoiNjQ4ZmU2NThkYTdjNDg3NzkxZTg4ODc3NTE1M2Q3NjRmZWNlMzJmYjNkMTg5NWU1N2YxZDNjMzY5ZGFkYTk1MyIsImlhdCI6MTY4ODU4MzM4NSwiZXhwIjoxNjg4NTgzNDE1LCJpc3MiOiJodHRwczovL2F1dGgudml2b2tleS5jb20iLCJqdGkiOiIwZTgyYzFlZTllN2I4M2Q0Mzg1NWU2YjM4OGYxZmZiODI3OTE2MzQxNWJiNWU2NTMzODU4MDc4ZGY5YjM4ZTVhIn0.7xNJ6fSjf_CuawElJMZvnwvDF5VwBr6j4Wac2r2F7R0BoNydCXeQ72MUteZdwHDE6Z5_roh1sBrY-zs9pmQ-UA"}
• Inspect authenticity JWT with jwt.io (includes public key to validate signature)
Using CMAC validation
There are some circumstances where doing direct NFC authentication with a VivoKey product might not be possible or preferred. For example, retail items with a VivoKey authenticity NFC transponder embedded or affixed to it. It would not be ideal to ask customers to have to install a special application in order to verify the authenticity of a product. They should just be able to tap their phone to bring up a browser that shows the product is authentic. This is exactly the kind of low risk scenario that CMAC based validations are good for.
Using CMAC as a validation method is not as secure as direct authentication methods, but in low risk scenarios like the authenticating of retail items in a storefront, this level of security assurance is acceptable. Using CMAC validation to secure user accounts or personal identity is not acceptable. The difference has to do with both the consequences of a successful attack as well as the modality of the attack. A spoofed CMAC signature on a fake product will only work for one scan and then fail, but if used to secure someone's identity or digital account, it would only take a single successful spoof to potentially take over a person's identity or account.
- Spark 1 - Does not support CMAC signed URLs
- Spark 2 - Supports CMAC signed unique URLs
- Apex - NFC Sharing applet supports CMAC signatures
Spark 2 authentication using CMAC signature validation (cmac)
Spark 2 chips have an NDEF record which contains a unique URL with CMAC signature appended. This URL cannot be changed, but the CMAC changes each time the Spark 2 is scanned. The URL written to the Spark 2 begins with https://vivokey.co/ followed by a unique ID and then the CMAC signature. To validate the signature, you must submit everything following the https://vivokey.co/ portion of the URL. For example, if you read the URL from the Spark 2 as https://vivokey.co/3c8d418757dcce5459f5b8576a5fb652/?sun=042468222F5C80-00003C-AE4F60A1AF728AB4 then you would submit the following to the /validate endpoint.
{“signature“: “3c8d418757dcce5459f5b8576a5fb652/?sun=042468222F5C80-00003C-AE4F60A1AF728AB4”}
{“result“: “success”,“token“: “eyJ0eXAiOiJKV1QiLCJhbGciOiJFUzI1NiIsImtpZCI6ImprM3JXNEhBVm9HSzl6QVhsdnVzdnMxdTFLeVlMRUxYRG10OXlTOXViYUkifQ.eyJ0eXBlIjoyLCJwcm9kdWN0IjoyLCJhdHAiOiJjbWFjIiwic3ViIjoiZDYwOGFhZGYwYjI1MmE4N2EwYmEyMGQ3NTQ1NDM1N2Y3Y2Y5NDZlNWZjM2VjMmQ4YjViZmY4NGRhODg4Yzk5ZSIsImlhdCI6MTY4Nzg0MjAzMSwiZXhwIjoxNjg3ODQyMDYxLCJpc3MiOiJodHRwczovL2F1dGgudml2b2tleS5jb20iLCJqdGkiOiI2ODY0NTdjMjBmNjZkOWU1YWI3ZWQyMzMxYmYyOGMyNWE0ZjI4NGQ0MTAyZWFjMmE2YTUxNjc0NjdmMTcxYTI2In0.guSNm14-Nwf7nniN2Am9efCZCyW86ZXjC4F5Y08UzAVCqO4lbYTT5Wb6ip3g4Wf-OFCQNoe1G-E1NNZBlz-FeA”}
• Inspect authenticity JWT with jwt.io (includes public key to validate signature)
NFC Sharing for Apex using CMAC signature validation (cmac)
The NFC Sharing app for Apex may have (this feature is optional) an NDEF record which contains a unique URL with CMAC signature data included. The CMAC changes each time NFC data is read from the applet. To validate the signature, you must submit the entire AES CMAC data element. For example, if you program the NFC Sharing app for Apex with the following URL data;
https://testing.com/signature/?s={AES128_CMAC_SIGNATURE_XXXXXXXXXXXXXXXXXXXXXXXXXXXXXXXX}
When read data is read back from the NFC Sharing app, the marker will be replaced with signature data such as;
https://testing.com/signature/?s=FF0A01128731FBB6-000005-E92AB4B81AAA1FEAB2C4D2AF4665AD19
You would then submit the signature data to the /validate endpoint like this;
{“signature“: “FF042468222F5C80-00003C-AE4F60A1AF728AB4”}
{“result“: “success”,“token“: “eyJ0eXAiOiJKV1QiLCJhbGciOiJFUzI1NiIsImtpZCI6ImprM3JXNEhBVm9HSzl6QVhsdnVzdnMxdTFLeVlMRUxYRG10OXlTOXViYUkifQ.eyJ0eXBlIjoyLCJwcm9kdWN0IjoyLCJhdHAiOiJjbWFjIiwic3ViIjoiZDYwOGFhZGYwYjI1MmE4N2EwYmEyMGQ3NTQ1NDM1N2Y3Y2Y5NDZlNWZjM2VjMmQ4YjViZmY4NGRhODg4Yzk5ZSIsImlhdCI6MTY4Nzg0MjAzMSwiZXhwIjoxNjg3ODQyMDYxLCJpc3MiOiJodHRwczovL2F1dGgudml2b2tleS5jb20iLCJqdGkiOiI2ODY0NTdjMjBmNjZkOWU1YWI3ZWQyMzMxYmYyOGMyNWE0ZjI4NGQ0MTAyZWFjMmE2YTUxNjc0NjdmMTcxYTI2In0.guSNm14-Nwf7nniN2Am9efCZCyW86ZXjC4F5Y08UzAVCqO4lbYTT5Wb6ip3g4Wf-OFCQNoe1G-E1NNZBlz-FeA”}
• Inspect authenticity JWT with jwt.io (includes public key to validate signature)
Live CMAC signature test
Using the form below you can test CMAC signature validation using your API key and the CMAC data and signature.